CS2212 - Brief Introduction to Writing Java Code that has a Graphical User
Interface, Writing PHP Code and Writing a Facebook Application
This workshop will probably take about 2 hours.
- You will need to have access to your amazon machine for most of this workshop. Install the java and git on your virtual lab machine as follows:
- # To install Git
sudo apt-get install git-core
- # To install Java
sudo apt-get install openjdk-7-jdk
- # To install Curl (curl is a library that lets you make http requests in php)
sudo apt-get install php5-curl
- #Restart apache
sudo service apache2 restart
- NOTE: In Eclipse, to see the possible methods for a class pop after you hit the . after an object, you should go to Windows>Preferences>Java>Editor>Content Assist>Advanced and make sure that Java Proposal is selected.
- Go to the website http://docs.oracle.com/javase/tutorial/uiswing/components/ and browse to see what objects (buttons, menus, textboxes) are available to you to use in a Java Graphical User Interface. Also, here is another tutorial you might want to bookmark, it was suggested by a former cs2212 student as very useful: http://zetcode.com/tutorials/javaswingtutorial/
- Start Eclipse on Unix by typing eclipse or on Windows by clicking on the
icon. If the Icon in Windows does NOT work, you should go to C:\Program Files\eclipse and click on the icon there (this is likely happening because your workspace area is not set yet)
- We are going to write a Java Applet. It is very similar to a Java Application except it runs inside a browser, so it is helpful if you know a little bit of html as well.
- Do File>New>Project>Java Project, give it any project name you want, then click on the Finish button
- Do File>New>Class Call your class FirstGUI
- In FirstGUI, we are going to create a simple GUI, (copy and paste the code below) into that file.
This program will have a panel (outer area)
that holds components, in this case 3 components (2 buttons and 1 label). You can cut the code from below, or get it from this file http://www.csd.uwo.ca/~lreid/cs2212/Worksheets/FirstGUI.java this code
does the following:
- Creates a panel
- Creates 2 buttons
- Puts the buttons inside the panel
- Add listeners for the 2 buttons
- Does something if either of the buttons is pressed
- Look over the code to make sure you see where the 5 steps above happen and the lines of code that cause them.
- Notice that the init method is similar to the static void main method in a Java Application.
Sample code:
import javax.swing.*;
import java.awt.*;
import java.awt.event.*;
public class FirstGUI extends JApplet
{
private JPanel outerPanel;
private JButton button1;
private JButton button2;
private JLabel lbl;
// Define handlers for each event needed (button1, button2)
private class Button1Handler implements ActionListener
{
public void actionPerformed(ActionEvent e)
{
JButton tempButton;
tempButton = (JButton) e.getSource();
JOptionPane.showMessageDialog(outerPanel,"Button 1 pressed");
tempButton.setToolTipText("Hi, I am a cs2212 button");
tempButton.setForeground(Color.ORANGE);
}
}
private class Button2Handler implements ActionListener
{
public void actionPerformed(ActionEvent e)
{
JOptionPane.showMessageDialog(outerPanel,"Button 2 pressed");
}
}
public void createStuff() {
outerPanel = new JPanel();
button1 = new JButton("Click Me");
button2 = new JButton("Button 2");
button1.addActionListener(new Button1Handler());
button2.addActionListener(new Button2Handler());
lbl = new JLabel("Hello World");
}
public void init()
{
createStuff();
outerPanel.add(button1);
outerPanel.add(button2);
outerPanel.add(lbl);
this.add (outerPanel);
}
} |
- RUNNING THE SIMPLE GUI: Save the code (saving the code will display any syntax errors you have, if you just cut and pasted the code from above, you should NOT have any syntax errors). Then run the program to see what is displayed. NOTE: The first time you run it, run it from the Menu Bar (don't use the run button on the tool bar), to run it from the menu bar: select Run>Run As>Java Applet Try clicking on each of the 2 buttons to see what happens. After clicking button1, try hovering over it.
- CHANGING ATTRIBUTES: See if you can figure out how to change the buttons background colour and
foreground colour. Hint: go to the java api
for javax.swing. Then look up JButton and find the method that will set the
background color...I have bolded and made red the words that might help you find the correct methods ;-), they are methods from the JComponent class that are inherited by the JButton class. You might want to use the static Color class constants for
the colours you want, for example Color.BLACK. NOTE: if you are doing this on a Mac computer, the background colour might not change (it is using the default look and feel for Macs, but the foreground should change color). Hint: In Eclipse, if you type slowly, after you hit a period, you will see available methods for that object. For example, type button1. and then wait for a second after hitting the period and you will see some methods pop up, then continue typing like this button1.s (just the s) and you will see all methods that start with s. Try this also with Color. Run the program again to test your code.
- ADDING A MENU BAR: See if you can figure out how to add a menu: Hint: create a JMenuBar (this
is a menu bar at the top of a window) and
attach it to the this applet using this code
this.setJMenuBar(bigmenubar); //this should go in the init method
then create a JMenu (this would be like the File
menu or the Edit menu) object, create some JMenuItem objects (these
would be like the New, Open, Print, Print Preview or Exit inside the File
menu) and
add them to the JMenu, attach the JMenu object to the JMenuBar. HINT: when you
use the new command to create a JMenu or JMenuItem, make sure you put the name
you want as a parameter, for example: printMenu= new JMenuItem("Print");
or else it wont show up on the menu bar. After you get the
menu displaying, try adding a separator (addSeparator)
- MAKE THE MENU BAR DO SOMETHING: Add an exit menu item and make the code quit when the user its that menu
item. Hint: System.exit(0); will cause the code to quit, so this is the action
you want to occur when the user picks the exit option from the menu. (remember
to tell the Exit JMenuItem to listen by adding an actionlistener to it, like
was done for the JButtons, also you will have to write a private class just like Button1Handler for the exit menu item that calls the code System.exit(0);)
- ADDING BUTTONS THAT PERFORMS AN ACTION: Add 3 more buttons, call them Button 3, Button 4 and Button 5. Make one of the buttons actually do something: it should change the colour of the
background of outerPanel. Hint: not only will you need to define the buttons and created
them and add them to the outerPanel, but to make one of the buttons change the background colour,
you will need to add an action listener for that button. When testing the new button, try
resizing the window FIRST, then set the background colour. Notice that the
buttons don't resize.
- EXPERIMENTING WITH LAYOUT OF THE ITEMS ON THE SCREEN: We are now going to try moving the buttons around. Change the code as
follows and then try resizing the windows and try clicking on your button to
change the background.
outerPanel.setLayout(new BorderLayout());
outerPanel.add(button1, BorderLayout.NORTH);
outerPanel.add(button2, BorderLayout.EAST);
outerPanel.add(button3, BorderLayout.WEST);
outerPanel.add(button4, BorderLayout.SOUTH);
JPanel innerPanel = new JPanel();
innerPanel.add(button5);
innerPanel.add(lbl);
outerPanel.add(innerPanel, BorderLayout.CENTER);
|
- Run the program. Resize the screen and watch what happens.
- Now change the line: outerPanel.setLayout(new BorderLayout()); to be
outerPanel.setLayout(new BorderLayout(10,20)); save the program, run
it again and click on your
background button.
- Now change that line to: outerPanel.setLayout(new GridLayout(1,5));
and run the program and try resizing the window, TRY MAXIMIZING YOUR WINDOW.
- Now change that line to: outerPanel.setLayout(new GridLayout(5,1));
and run the program
- Now change that line to: outerPanel.setLayout(new GridLayout(5,1,10,20));
and run the program
- Now change that line to: outerPanel.setLayout(new GridLayout(3,5));
and run the program
- Now change that line to: outerPanel.setLayout(new GridLayout(4,6));
and run the program
- Notice that your applet is always running in a litte applet viewer. It would be nice to see what it actually looks like in a real browser. In order to do that we need to write some simple HTML code to call the applet. This html code should be in the same location as the .class file, so using Windows Explorer, find the /bin folder where your FirstGUI.class file is being stored.
- In the /bin folder that is inside your Eclipse Workspace, inside the folder for the project you created above in step 6, using Notepad (or a simple text editor), create a new file called index.html and put the following into it:
<html>
<title>My First Applet </title>
<body>
<h1>Let's Try This Out</h1>
<applet code="FirstGUI.class" width=400, height=200>
</applet>
</body>
</html>
|
- Now open this file in IE, or Firefox or Chrome.
- NOTE You might get an error at this point, if you get the error "Application Blocked By Security Settings", do the following> go the Control Panel>Programs>Java>Security Tab, change it to medium. Also, make sure that you go to Control Panel>Programs>Java>Advanced Tab and select Show Java Console and select Enable Tracing and select Show Applet lifecycle exceptions
- You should now see your little applet in a browser but notice that the Exit menu item no longer works, that is because you would use the browser now to leave this page, not your menu bar. Try changing the width and height attributes in the index.html file and reload it again in the browser. WARNING: if you change the code for the FirstGUI.class, you will need to close the browser (IE) and start it up again because refresh/reload only reloads the html NOT the .class file, it gets cached!
Approximate Time to Complete the Above Exercises: 1 hour
Making Your First PHP Application
- Now we are going to make a simple PHP program that reads input from a form on a webpage and sends the input to a java applet. PHP only runs on a webserver, so while we can build the PHP file and html file and .java files on our local machine, in order to test everything, we have to move them up to the ec2 Amazon cloud virtual machine that you created in the earlier lab.
- Let's make the html file that will allow a user to enter information: Create a new directory on your laptop/local machine and inside that new directory make a file called index2.html. Using Notepad, put the following into that file:
<html>
<title>Making a Form </title>
<body>
<h1>Trying out a form</h1>
<form action="simple.php" method="post">
First Name: <input type=text name="firstname"/><br/>
Last Name: <input type=text name="lastname"/>
<input type=submit />
</form>
</body>
</html> |
- Double click on this file to open it in a browser and make sure that it has 2 locations to enter names and a button.
- Now let's create the PHP code to get the information and pass it to your java applet. In the same directory as the file called index2.html, create a file called simple.php, using notepad, put the following into the simple.php file:
<?php
$fname = $_POST['firstname'];
$lname = $_POST['lastname'];
echo("<applet code=FirstGUI.class width=400 height=400>");
echo("<param name=\"first\" value=\"" . $fname . "\">" );
echo("<param name=\"last\" value=\"" . $lname . "\">" );
echo("</applet>");
?>
|
- The above code takes what the user typed into the firstname box and stores it in a variable called $fname. Then it called the FirstGUI.class applet and passes the $fname as a parameter to the applet. Now we have to change the applet code so that it will accept this parameter and the value that is stored in it and do something with that data in the applet.
- Get back into eclipse and edit your FirstGUI.java file. In the init method, at the very bottom of this method, add the following code:
String fn = getParameter("first");
String ln = getParameter("last");
button1.setText(fn);
button2.setText(ln); |
- The above code accepts the parameters from simple.php and puts it in the string variables fn and ln. Then it displays those valueson button1 and button2
- Now you have to make sure all this worked! You need to move the files: index2.html, simple.php and FirstGUI.class (and any buttonhandlers.class for FirstGUI.class) onto your Amazon Virtual Machine. Make sure you move these files into the directory /var/www You will need to use something like WinSCP (on Windows) or scp (on Mac/Linux). You set this up on page 19 of the Amazon Virtual Machine tutorial.
- Get into a browser and go to your virtual machine domain name and put /index2.html at the end of your URL
- If everything worked you should see your first and last name on the buttons in your applet after you complete your form! (note: sometimes if you make changes to the applet you have to close the WHOLE browser (all the tabs) for the new applet to get loaded)
. READ ALL OF THE FOLLOWING 3 NOTES:
- NOTE: To be able to see the Java Console while you are debugging (so you can see your System.out.println...etc), do the following:
- Windows users will click on the Control Panel and then click on the Java Icon. Mac users will click on System Preferences and then click on the Java Icon. At this point, both Windows and Mac users will click on the Advanced Tab, then under Debugging, make sure that Enable tracing, Enable logging and Show applet lifecycle exceptions are ALL CHECKED. ALSO make sure that under Java console that Show console is SELECTED.
- NOTE: when viewing your applet in your browers IF (and only if) you get an error with caching, you may have to clear out the Java cache (not just clear the cache from the browser but from you whole machine). You can do one of these options:
- On Windows, do Ctrl Alt Delete and then select "Start Task Manager" and then click on the Processes Tab. Select the java.exe process and then select end process (Nowthe latest version of your applet will be reloaded, the old version will no longer be held in the cache)
- Windows users will click on the Control Panel and then click on the Java Icon. Mac users will click on System Preferences and then click on the Java Icon. At this point, both Windows and Mac users will click on the General Tab, then under the area called Temporary Internet Files, click on the Settings... button. Uncheck the box called "Keep temporary files on my computer." and click on the Delete Files... button, then click on OK and then OK again, then reboot your machine.
- Thus the above steps told you how to:
- Create a simple applet with a GUI
- Run the applet with an html file
- Build a .php file that can take information from a form on an html file and pass the information to the applet
Working with Persistant Data - Reading/Writing to Files
- When working with applets, applets will ONLY accept data from the server they were served up from. This means that we must use PHP to move files to and from other areas on the internet to our Amazon server and then we can send the data to the applet. Also, applets run on the clients machine, so you can't write data to the Amazon server, since an applet wants to write to the client machine. Only the php code can write data to the Amazon server. Thus, you will have to have PHP handle all the file i/o. If you want the Java Applet to send data to the Amazon virtual machine you will need to set up connection objects. This page gives you a little tutorial on how to do this: http://docs.oracle.com/javase/tutorial/networking/urls/readingWriting.html Try this part out on your own time. Also please note this problem that previous students had:
If you are POST-ing data from your Java class to your PHP script, and you are finding that it is not sending anything, then you may wish to read the following: http://stackoverflow.com/questions/4844535/why-do-you-have-to-call-urlconnectiongetinputstream-to-be-able-to-write-out-to
In short, even if you're just POST-ing data (writing data using a POST and php) and you don't care about the server response, it would appear that you still have to call the getInputStream() method after POST-ing your data. Otherwise, nothing will get POST-ed.
- Let's try to just make some simple php that will read and write to a file in a subdirectory on the virtual machine. We will make a simple form that allows us to pick a file name, a subdirectory (that exists) and some data to put in the file. Then we will check the Write to above file radio button. Get into an editor, create a file called filereadwrite.html and type the following html tags and data into it:
<html>
<title>File IO </title>
<body>
<h1>Reading and Writing from Files</h1>
<form action="fileio.php" method="post">
<br>File Name: <input type=text name="filename"/>
<br>Subdirectory (must exist): <input type=text name="dir"/>
<br>Contents for File: <input type=text name="texttobeputinfile"/>
<br>Read from above File<input type=radio name="group1" value="read"/>
Write to above File<input type=radio name="group1" value="write"/>
<p><input type=submit />
</form>
</body>
</html>
|
- Save the file and move it to your amazon ec2 machine, put it in the directory called /var/www
- While you are in the /var/www create (mkdir) a new directory called holder. Thus you should now have a directory called /var/www/holder
- Change the permissions on the new directory as follows:
chmod 1777 holder
(this will set the sticky bit so that people can write to this directory)
- Using a browser, open your virtual machines address with filereadwrite.html at the end of it, for example, something like this: http://ec2-23-22-200-127.compute-1.amazonaws.com/filereadwrite.html (or you could use the http://westernid.cs2212.ca domain name instead of the long ec2 name and put /filereadwrite.html at the end)
- Make sure your html is displaying a simple form. Now let's write the code to read and write from a file. Open the editor again and create a file called ________________ (look at the filereadwrite.html and see if you can figure out what is the name of the php file that is going to receive the information about the file name and location and contents).
- Inside that new file add the following PHP code:
<?php
$selected_radio_button = $_POST['group1'];
$dir = $_POST['??????'];
$filename = $_POST['??????'];
$text = $_POST['texttobeputinfile'];
$file= $dir . "/" . $filename;
if ($selected_radio_button == 'write') {
file_put_contents($file, $text.$text);
echo '<p><h1>Success Writing to File</h1>';
}
else if ($selected_radio_button == 'read')
{
$readfromfile = file_get_contents($file);
echo '<p><h1>Success when reading from file</h1>';
echo "<p><h1>File containted: $readfromfile</h1>";
}
else
{
echo "<p><h1>Something weird is going on, no file io!</h1></p>";
}
?> |
- I have purposely put some mistakes in the above php, change the ?????? to have the correct name of the form objects from your filereadwrite.html file (you should be able to figure this out)
- Move this file to the /var/www directory
- In a browser, go to your filereadwrite.html page and:
- Dont click on either radio button but do click on the submit button and watch what happens
- Click on the write radio button and put any filename you want, make sure the directory is the one you created above called holder and put any contents you want in the contents box and hit the submit button
- Now put the same file name and holder for the directory and Read from a file radio button and then hit the submit button, notice that the writing line concatenated the contents and wrote it twice, so when you read from the file, the contents that was displayed was the doubled word(s).
- Get back into the ec2 console and notice that the file is in the directory called /var/www/holder
- Go back into your browser and run the filereadwrite.html form again but this time put a directory that doesn't exist. Notice the error you get. Use the following method to fix your code to give a nicer message that the directory doesn't exist. The method to use is called is_dir(string filename). This method returns TRUE if the filename exists and is a directory.
- I found this great summary website of PHP code that you will find very simple and helpful: http://www.astro.ufl.edu/~warner/prog/php.html
Writing a simple Facebook application
- You have to have a Facebook account to do this. You can either use your current Facebook account, or make a fake one, in order to do the project and individual assignment in this course. There is a more info on this page: https://developers.facebook.com/docs/appsonfacebook/tutorial/#create if you can not get the below instructions to work
- LOG ON TO FACEBOOK (it is important that you are logged on for this step) and go to this site: https://developers.facebook.com/apps
- Click on the button called Create New App then on the next screen fill it in as follows:
- Under Display Name put WesternUseridworkshop, so, for example, I would put lreid2workshop
- Under Namespace put your WesternID WITHOUT Numbers (you cant have numbers in a namespace) then testone, so, for example, I would put lreidtestone
- Click on the continue box and fill in the code, then you should see something like the image below.
- Make sure Sandbox Mode is Disabled
- Click on the Checkmark next to App on Facebook to expand that area
- Into the box called Canvas URL: put your amazon URL name (we have it mapped with your userid and cs2212.ca) and the filename myfirstfacebook.php?, for example: http://lreid2.cs2212.ca/myfirstfacebook.php?
- Into the box called Secure Canvas URL put your amazon URL name (we have it mapped with your userid and cs2212.ca) with https and the filename myfirstfacebook.php?, for example: https://lreid2.cs2212.ca/myfirstfacebook.php?
- Your screen should look like this:
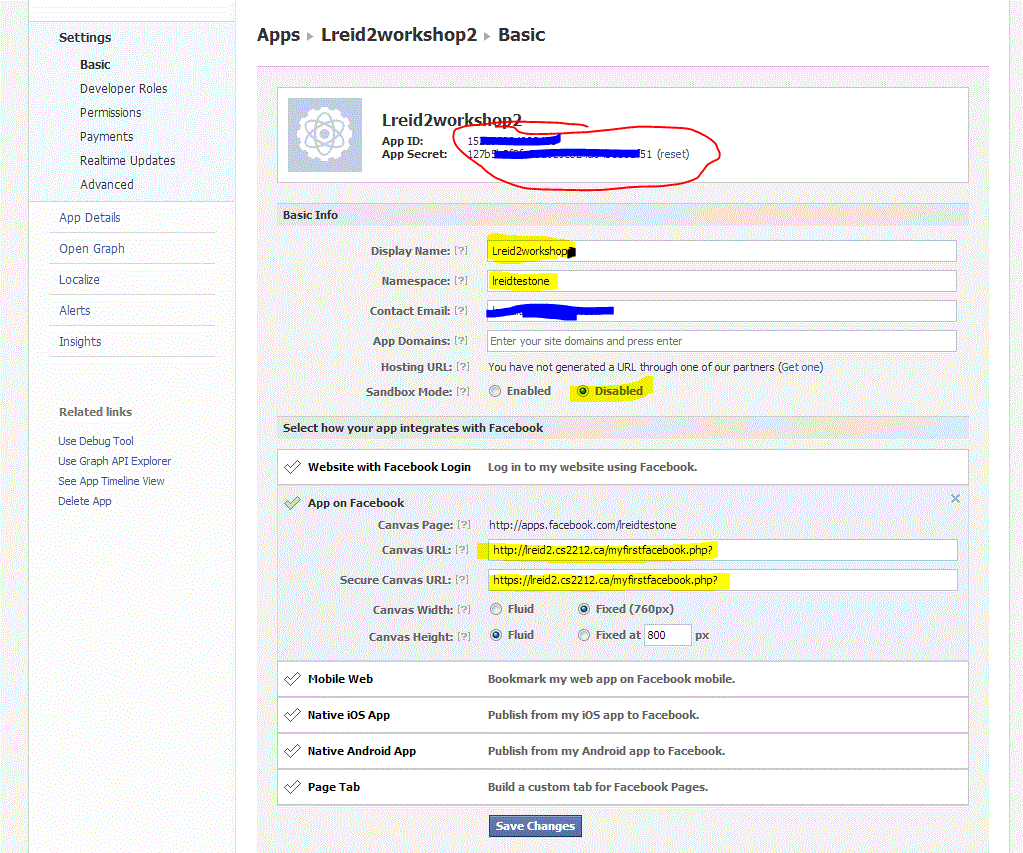
- Copy the numbers for App ID and for App Secret (circled in red above, but I hid my values so no one else can use them) and click on the Save Changes button
- In your normal facebook page, you should now see Developer link down at the bottom on the left, if you click on this link, it will take you back to the screen above (and back to the developers area)
- Download the following 3 facebook sdk files for php from GitHub and move them into your /var/www area on your amazon machine.
- https://raw.github.com/facebook/facebook-php-sdk/master/src/base_facebook.php
- https://raw.github.com/facebook/facebook-php-sdk/master/src/facebook.php
- https://github.com/facebook/facebook-php-sdk/raw/master/src/fb_ca_chain_bundle.crt
- Open an editor and create a file called myfirstfacebook.php and put the following code into it:
<html>
<head>
<title>Trying a facebook app</title>
</head>
<body>
<h1>Who Am I? </h1>
<?php
//the next 4 lines will bring the Facebook SDK in to your program and initialize it
require ("facebook.php");
define("FACEBOOK_APP_ID", 'PUT YOUR APPID FROM ABOVE SCREEN IN HERE');
define("FACEBOOK_SECRET_KEY", 'PUT YOUR SECRET KEY FROM ABOVE SCREEN IN HERE');
$facebook = new Facebook(array('appId' => FACEBOOK_APP_ID, 'secret' => FACEBOOK_SECRET_KEY));
$uid = $facebook->getUser();
if (!$uid)
{$loginUrl = $facebook->getLoginUrl();
echo "<script type='text/javascript'>top.location.href = '$loginUrl';</script>";
exit;
}
try {$uid = $facebook->getUser();
print $uid; //this is the unique number that identifies a facebook user
$user_profile = $facebook->api('/me','GET');
echo "<br>First Name: " . $user_profile['first_name'];
$profilepic= "https://graph.facebook.com/" . $user_profile['id'] ."/picture?type=large";
echo "<p>URL Location of my facebook profile picture: " ;
echo $profilepic;
$headers = get_headers ($profilepic, 1);
$url = $headers['Location'];
echo "<p>URL location of my facebook profile picture if I need to get at the .jpg file:";
echo $url;
echo "<img src=\" $profilepic \"/>";
echo "<p>";
$friends = $facebook->api('/me/friends',array('fields' => 'id,name'));
echo '<ul>';
foreach ($friends["data"] as $value) {
echo '<li>';
echo '<div class="picName">'.$value["name"].'</div>';
echo '</li>';
}
echo '</ul>';
} catch (FacebookApiException $e) {
print "in error exception";
echo ($e);
}
?>
</body>
</html>
|
- Make sure the lines that start with define contain your APP ID and APP SECRET (circle in red in the image above)
- Open the URL for your virtual machine and click on myfirstfacebook.php. If you are NOT logged into facebook, it will request that you log in, if you are logged in, it should display your profile picture and your first name and all your friends.
- This link shows you some of the information you can get about a facebook user --> https://developers.facebook.com/docs/reference/api/user/Add a line of code that will not only display the users first name but also his/her last name and gender.
- Try out your app again, this time test it by going to: https://apps.facebook.com/WesternUseridtestone/.
- If you want to see how to reference items in the Graph API, go to this site: https://developers.facebook.com/tools/explorer
- Now, just to be on the safe side, let's push our code up to GitHub from Amazon as follows NOTE THIS WILL ONLY WORK IF YOU HAVE A GITHUB ACCOUNT:
- Go to http://github.com and log in
- Create a new public repository called GUIWorkshop, no description and do NOT check the "Initialize this repository with a README"
- Go to your Amazon machine and type:
ssh-keygen -t dsa
Hit <enter>
3 times
- then move the ssh directory
cd /home/ubuntu/.ssh
- then type
ls
- then copy the contents of the file called id_dsa.pub into your clipboard
- Go back to http://github.com and click on the Account Setting button in the top right (wrench and screwdriver icon)
- Click on SSH Keys along the left
- Click on the Add SSH key
- Set the title to be something like: My Amazon Key
- Paste the contents of the clipboard in the area called Key
- Go back to your Amazon window
- Move back (cd) to where your facebook code was (likely /var/www)
- Type the following:
git init
git add .
git commit -m "My GUI Workshop"
git remote add origin git@github.com:yourgithubname/GUIWorkshop.git
git push -u origin master
- Once you have starting using GitHub for your project, remember that the work flow should be:
-push from your local machine to GitHub
-log onto your Amazon Machine
-pull from GitHut to your Amazon Virtual Machine to see if it works
You want to avoid pushing from Amazon Virtual machine and doing edits on the Virtual Machine because if the
Virtual Machine is ever accidently terminated, THERE IS NO WAY TO GET BACK YOUR DATA.
|
- Now you will have backed up all your stuff on your amazon machine to your repository on github!
More GUI Stuff --> Something fun, adding a slider
1. Edit the FirstGUI.java class file from above that you have already copied. MAKE SURE YOU CHANGE TO THE JAVA PERSPECTIVE IN ECLIPSE
2. Add a slider bar. I will give you the code, you have to figure out where it should go. Here are the pieces you will need to add (you just need to figure out where to put them AND you need to write the code to add the slider to the panel.)
import javax.swing.event.*; |
private JSlider redSlider; |
redSlider = new JSlider();
redSlider.setOrientation(JSlider.VERTICAL);
redSlider.setPaintLabels(true); //show tick mark labels
redSlider.setPaintTicks(true); //show tick marks
redSlider.setMinimum(0);
redSlider.setMaximum(255);
redSlider.setValue(100);
redSlider.setMajorTickSpacing(50);
redSlider.setMinorTickSpacing(25);
redSlider.addChangeListener(new SliderHandler()); |
private class SliderHandler implements ChangeListener {
public void stateChanged(ChangeEvent event) {
int r;
r=redSlider.getValue();
button1.setBackground(new Color(r,0,0));
}
} |
Now add the redSlider to the panel right after the buttons are added to the panel |
3.After you get your red slider bar working, try adding a green and blue one!
Approximate Time to Complete the Above Exercise: 15 minutes
More GUI Stuff -->Changing the color of groups of buttons/components
1. One fairly simple way to change the look of your window is to change the background and foreground of all the buttons/menu bars items/panels etc. on the window. For example, for a sunset theme, you might set the foreground to be red and the background to be yellow for some of the components on your window. One way to implement this, is to add all the components (buttons, etc) that you wish to change, to a bag/collections and then everytime you want to change the look, you just use an iterator to walk through the collection and change the colors. We are going to do this with FirstGUI (and the sliders that you added).
2. Add the following code in the correct locations to get access to a linkedlist where we will store all the buttons:
import java.util.*;
private LinkedList itemsForSkin;
3. Add the code to construct the LinkedList and add code similar to this: itemsForSkin.add(button1) to add ALL the components whose look you wish to change to the LinkedList (we will add the 2 buttons and the 3 sliders you made)
4. Add the following code in the appropriate location, so that when the user clicks on button2, the foreground and background of the buttons and sliders change as indicated in the code: (NOTE: this code walks through all the items in the linkedlist and changes them all to have a background color of BLUE, also add the line of code needed to make sure the items have a foreground color of YELLOW)
Iterator itr;
JComponent holder;
itr = itemsForSkin.iterator();
while (itr.hasNext()) {
holder = (JComponent) itr.next();
holder.setBackground(Color.BLUE);
}
Approximate Time to Complete the Above Exercise: 10 minutes