CVS and Groups Workshop
Practicing with UNIX Group Commands
(Note: if
you are familiar with the Unix group commands, you may skip this part)
- In the lab, sit in close proximity to your group
members
- Log onto gaul and type the command groups
- Write down what groups you are in:
_______________________
- Make sure that your groups members and you are all in
the same cs2212 group.
- In UNIX create a directory called cs2212stuff
- Go into that new directory and create a file as
indicated below
- Type pico junkYourUserID.txt and hit enter
- Type one or two sentences into this file, then type
<ctrl> x, then type "Y"at the prompt to save the file and save and close the
file.
- Type ls -lg to see the default group for that file
- Type chgrp yourgroupname junkYourUserID.txt
- Try to look at someone else in your groups file. NOTE: you
should not be able to yet because you have not change the group permission AND
you have not changed the permissions on the directory.
- Change the group permission with the chmod g+rwx
junkYourUserID.txt
- Do ls -lg to check that it worked
- Go up one directory and change the permission on the
directory and change the permission on the directory (chmod g+rwx cs2212stuff) and
the group (chgrp groupname cs2212stuff)
- Go back into that directory and type the command pwd
- Try to change the text in your groups members directory
of the same name (using the pwd command from above, figure out where your groupmates files are to change them)
- Create one more file in that directory called
MoreStuff.txt, put some text in it. Try to change this file in your group
members directories.
- You might not be able to because the group always
defaults to the default group unless, you set the permissions on the directory
as follows: chgrp -R groupname cs2212stuff AND chmod -R
g+rwxs cs2212stuff
USING CVS:
HAVE ONE MEMBER OF YOUR GROUP DO STEPS 1 TO 16, THEN HAVE THE OTHER MEMBERS JOIN IN. WHILE THE OTHER MEMBERS ARE WAITING, THEY CAN CLICK ON AND WORK ON THIS ECLIPSE DEBUGGING EXERCISE
- Have one member of your group (MemberA) type the commands:
cd home
chmod g+rx . (make sure you type the period)
- Have MemberA create a
directory in Unix on Gaul called Repo (for Repository)
- Have MemberA change the group to be your cs2212 group
for the directory:
chgrp –R cs2212-10? Repo
- Have MemberA set the permissions as follows:
chmod -R g+rxs Repo
- cd to Repo and type pwd and copy the
absolute path: ______________________
- HAVE YOUR GROUP MEMBERS WRITE DOWN YOUR ABSOLUTE PATH ALSO, THEY WILL NEED IT TOO!
- Have MemberA set up the initial repository by running
the following command:
cvs -d /gaul/...pathnamefromabove.../youruserid/Repo
init
- Run eclipse, have MemberA set up java project in
eclipse: (NOTE: if you have problems running Eclipse from the start menu, go to c:\program files\eclipse and run it from there and then pick a place OTHER than the C: drive for your workspace).
From main menu: File> New>Project>Java Project.
(Menus might be:File> New>Other>Java Project) Call it GroupCVSTest
- Have MemberA go to the website:
www.csd.uwo.ca/~lreid/cs2212/code and download the files NewSimple3.java and Group.java. Add these java classes into this new project. Have MemberA run
NewSimple3 to make sure that it works.
- Save both files.
- Have memberA go back onto Gaul and once more have MemberA change the group to be your
cs2212 group for the directory (chgrp –R cs2212-10? Repo)
- Have MemberA create a connection to the repository by
going to the Repository view in Eclipse:
Window>Open Perspective>Other>CVS
Repository.
Right click inside the repository area (usually on the left side of the
window) and select:
New>Repository Location
Have MemberA complete the wizard like this:
- Have MemberA open the navigator view:
Window>Show
View>Navigator (might be called Project Explorer now instead of Navigator)The window will likely be on the right bottom of the screen, it should look like this:

Click on your project GroupCVSTest, then right click on
it and share the project:
Team>Share Project
Follow the wizard, just hit next for each option, you may be asked to enter a comment, you don't have
to
- Commit all the files if prompted, if not prompted,
right click on GroupCVSTest project again, then choose Team>Commit
- Right click on the project and sync the project
Team>Syncronize with Repository, it should say no changes found.
- Have MemberA change the file Group.java so that the
first name in the constructor is MemberA's name not Peter Griffin, instead it
is MemberAs real name, then save the file
- Syncronize with Repository again. Should
indicate that Group.java changed. If MemberA, while in Synchronize view(,
clicks on the button Incoming/Outgoing mode,
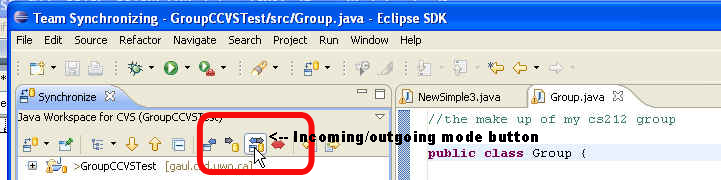 tnen expand the GroupCVSTest till you see Group.java. You should double click on Group.java and see what the line
originally looked like (and still looks like on Gaul in the Repo directory
because the changes have not been committed yet (The Remote File) VS the new
file with the changes made (The Local File).
tnen expand the GroupCVSTest till you see Group.java. You should double click on Group.java and see what the line
originally looked like (and still looks like on Gaul in the Repo directory
because the changes have not been committed yet (The Remote File) VS the new
file with the changes made (The Local File).
- Right click on Group.java and Commit the change you made to the name in Group.java.
NOW THE CHANGES MADE ABOVE
WILL BE ON GAUL IN THE REPO FILE (this area
is where the master versions of all classes/files are kept)
(about 20 minutes to get to this point)
NOW HAVE THE OTHER MEMBERS JOIN IN!
- Now have the other members go into eclipse. The other
members should:
- Get the Repository view:
Window>Open Perspective>Other>CVS Repository
- Right click inside the CVS Repositories Tab area (usually big area in top left corner of the window) and select
New>Repository Location
- Complete the wizard like this:
- In Host put: gaul.csd.uwo.ca
- In Repository path put the path where MemberA created Repo, for example: /gaul/s1/student/2004/lreid99/Repo
- In User put YOUR GAUL USER ID
- In Password put YOUR GAUL PASSWORD
- In Connection type, drop down and select:
extssh
- Select Finish from the wizard (this may take a
minute or two)
- You should ONLY have to do the above steps ONCE for
your project, once the connection is set up, if you always use the same
machine (like say your home desk top), the connection should remain.
- Expand the Repository view (:extssh:...) for the new connection,
then expand HEAD
- Under HEAD you should see GroupCVSTest/src project that MemberA created, and
if you expand that you will see the files/classes MemberAadded to the repository on MemberAs directory on gaul.
- Select the project (GroupCVSTest) right click and
choose Checkout as Project
- Select the Navigator/Project Explorer view (From Main Menu,
Window>Show View>Navigator (it might be called Project Explorer now)), it should now include GroupCVSTest as a
project
- Each new member should right click on the file
NewSimple3.java and select Run As>Java Application, then click on Button 2
and play with the slider to see what the code does.
- Have each new member (not memberA) open(right click on Group.java and pick open) the file Group.java and change the file
Group.java. All new members should change Group.java so that MemberA has
whoever is typings name (thus if I am Laura Reid, then I would set the code
in the constructor for Group.java so that it says memberA="Doug Vancise";
but if I am Mike Bauer, then i would change the exact same code so that it
says memberA="Mike Bauer"; NOTE: make sure you double click on the
Group.java file FROM the Navigator Perspective NOT the Repository Window
because you might not be able to change the file from that window.
- Run the program again and click on Button 2 to make sure the change
worked
- In the Navigator Window, select the project, right
click and select Team>Syncronize with Repository
- In the Synchronize View, double click down until you see Group.java
and then double click on the file Group.java, you should see the original way you received the file
and the new changes
- Then commit the changes (right click, Team>Commit)
NOTE: Whoever got to commit first, his/her changes WILL take place, the
remaining members should get an error
- The members who received an error, should right click
on the Group.java file and then click on Team>Update, then the
changes should be displayed that the first member to click in did (i.e. what
is in the repository)
- Each member, even MemberA should try doing the whole
process again the correct way:
- Every member should always check out the files he/she
needs by: from the Main menu, select Window>Open
Perspective>Other>CVS, then right click on GroupCVSTest and select
Check Out
- Make sure a Project Explorer Window is open, (Window>Show
View>Project Explorer)
- Double click on the file Group.java
- Make your changes again (this time put your favourite
T.V. show character in the constructor for memberA)
- Have one member commit his/her changes first, then
have the other members do syncronize with repository to see the changes. You can
play around with the buttons that will let you move in the lines that were
in the repository into your changed code, then have the members do the
commits one at a time.
- NOTE: most of the time you will not be working on the
same files/classes at the same time but CVS should help you not screw up each
others work!
- If you want to see changes that are coming in, make
sure you are in incoming mode (press the Incoming Mode button on the
Synchronize Tool Bar), then click update, this will cause your workbench to be
updated with the repository copy of the file you are working with
- If you are suspicious of the change you made and want
to find more info, you need to figure out who did previous changes and why.
You can see this in eclipse by choosing Team>Show History from the right click menu of the Project Explorer view. NOTE: you must right click on a
FILE not on the project!
- If you want to replace with an earlier version of a
file (because say you realized your updates were wrong but you had already
committed your changes) then you would:
- In Project Explorer view, select the file
- Right click on the file and select Replace With
> History
- In the replace with revisions compare editor that
opens, choose the original (bottom most) and you will see the original file,
you can copy the contents from that file.
- To version your project:
- Select the project
- In Project Explorer view, select Team > Tag as Version
- When the Tag Resources dialog opens enter the version
name A1 and click OK
- Select the CVS Repository View
- Expand Versions and the project name. Notice now the
project has a version number.
- You can add other files to the repository than just .java files. For example, you could add your class diagrams and use case diagrams to the repository. IT IS A GOOD IDEA TO ADD ALL YOUR DATA FOR THE ASSIGMENTS, SUCH AS YOUR CLASS DIAGRAMS (visio files) and your Gantt charts and your group reports TO YOUR GROUPS REPOSITORY. Have member A add the following four files to the repository and have the other members check them out and look at them. The files are: SampleClassDiagram.pdf, SampleClassDiagram.vsd, SampleUseCaseDiagram.pdf, SampleUseCaseDiagram.vsd Add these files as follows, have MemberA do the following:
- On your desktop, create a folder called DocumentationFiles
- Copy the four files above (the .vsd files and the .pdf files) into the folder DocumentationFiles
- Get back into Eclipse and into Project Explorer window (Window>Show View>Project Explorer) and right click on the project GroupCVSTest. Then select Import. Then select General>File System>Next
- In the area called From Directory, browse to the folder called DocumentationFiles on your desktop
- Check off all 4 files and hit Finish.
- THIS JUST ADDS THE FILES TO MEMBERA's PROJECT, NOW MEMBERA MUST COMMIT THEM TO THE REPOSITORY:
- In the Project Explorer window, right click on GroupCVSTest, select Team>Commit
- Put the comment: Add some documentation visio files and hit Finish
- NOW THE OTHER GROUP MEMBERS SHOULD BE ABLE TO CHECK OUT THOSE FILES! Have the other members right click on the GroupCVSTest in the Project Explorer Window and do Team>Update You might want to do this with ALL your group assignment files for cs2212!
- We just created a sample repository. Now lets create the real one to use for the rest of the term for your group. Pick one member to have the projects repository. Now have that person do the following:
- Log onto gaul and go to his/her root directory
- Create a directory on gaul called cs2212project
- Change the group to be your cs2212 group
for the directory:
chgrp –R cs2212-10? cs2212project
- Sset the permissions as follows:
chmod -R g+rxs cs2212project
- cd to cs2212project and type pwd and copy the
absolute path: ______________________
- HAVE ALL OTHER TEAM MEMBERS WRITE DOWN THE ABOVE ABSOLUTE PATH
- Have the one member set up the initial repository by running
the following command:
cvs -d /gaul/...pathnamefromabove.../youruserid/cs2212project
init
- Go into eclipse and have all the other members try to access the new repository
- FINAL HELPFUL NOTE: Employees like to see that computer science students have had experience with code repositories, so make sure you include that you have used CVS on your resume :-)
about 30-40 minutes to get to this point
Using the Debugger in Eclipse
- Go into eclipse and start a new java project (From main menu select -->
File, New, Project, call the project DebuggingTests)
- Create a new class called MyMain (from main menu select --> File, New,
Class)
- Go to this website: http://www.csd.uwo.ca/~lreid/cs2212/debugger/MyMain.java and paste
the code into MyMain
- Create a new class called AnotherClass
- Go to this website: http://www.csd.uwo.ca/~lreid/cs2212/debugger/AnotherClass.java
and paste the code into AnotherClass
- Save and run (right click on MyMain.java in the Package Explorer Window,
then select Run As, then select either Run OR Java Application) the program MyMain once, just to see what it does (look at
the code, it is fairly simple)
- Change from the Java Perspective to the Debug Perspective (Window, Show
Perspective, Other, Debug)
- Set a breakpoint on the line--> y = junk(100); (the fifth line in the main
method). The way you set a breakpoint is you double click on the area in the
left, before you set the breakpoint you will see:

after you set the breakpoint you will see:

- Run the program as normal with the Run option (you should see no change)
- Now run the program using the Debug Run (click on this:
 ,the icon looks like a
little bug) The program will now stop at the breakpoint line. Hover your mouse
over the variable x in the line above--> x=junk(50); you should be able to tell what value is in the
variable x right now.
,the icon looks like a
little bug) The program will now stop at the breakpoint line. Hover your mouse
over the variable x in the line above--> x=junk(50); you should be able to tell what value is in the
variable x right now.
- Click on the Step Over button on the debug tool bar and watch what happens
 .
Click on it again and hove over the variable x as you do it each time. Watch
the x change values. Continue clicking on the Step Over button till you reach
the second System.out.println, then click on the Resume button:
.
Click on it again and hove over the variable x as you do it each time. Watch
the x change values. Continue clicking on the Step Over button till you reach
the second System.out.println, then click on the Resume button: The Resume button will continue the program on till the end of the program (or
a prompt or the next breakpoint)
The Resume button will continue the program on till the end of the program (or
a prompt or the next breakpoint)
- Run the program again in debug mode, this time, when you hit the
breakpoint, use the Step Into button (not the Step Over button) Keep clicking
on the Step Into button and notice the difference between it and the Step Over button
- Now put a breakpoint somewhere in the constructor of AnotherClass
and watch what happens when you run in debug mode. Watch what happens when you
click Resume (it should stop at your next breakpoint). Also notice in the
debug window, you can tell which class and which method you are in. Now Terminate/stop (the red square) the program

- Put a breakpoint on the line--> x=17; Run the program again in debug
mode, when you get to the breakpoint, right click in the Variables window and
add a watch by clicking on the Watch option. The Expressions window will show
up, right click and select Add Watch Expression, type z in the box that
appears, then add another watch for y. Then click on the Step Into button until
you get to the line--> x=x+10; Double click on the + next to the z in the Expressions window. See if you can change the value of the z.zz variable while
it is still running (hint: right click on the zz variable in the expressions
window).
- There are lots of other things the eclipse debugger will let you do, but
this should at least get you started!